Scaling, or simply resizing, is the process of increasing or decreasing the size of an image in terms of width and height.
Two important things to keep in mind while resizing images:
- Aspect Ratio
- Interpolation
We have two ways of image resizing, either to pass in the desired values for height or width or resize by a percentage.
Note: Always remember while OpenCV deals with images as x,y (or) cols,rows; NumPy treats them as y,x (or) rows,cols this is the reason when you run image.shape you will get rows, cols but when you specify a size to resize you will enter cols , rows.
import cv2
import numpy as np
import matplotlib.pyplot as plt

img = cv2.imread('media/M2/party.jpg',1)

# Method 1
# make the image 50% of its orignal size
halfimg = cv2.resize(img, (0,0), fx=0.5, fy=0.5)

# Method 2
#Specify a custom size, width first than height
custom_size = cv2.resize(img, (500,500))

plt.figure(figsize=[20,20])
plt.subplot(131);plt.imshow(img[:,:,::-1]);plt.title("Original");
plt.subplot(132);plt.imshow(halfimg[:,:,::-1]);plt.title("50% Reduced Size");
plt.subplot(133);plt.imshow(custom_size[:,:,::-1]);plt.title("Custom Size");
Ouptut :

Did you noticed the problem with the custom size, the image look distorted, this happens if you try to specify both custom height and weight. So in order to prevent such distortions from happening you have to keep the Aspect Ratio (width/height ratio) constant.
Note: Always remember while OpenCV deals with images as (x, y) or (cols, rows), NumPy treats them as (y, x) or (rows, cols) this is the reason when you run image.shape you will get (rows, cols) but when you specify a size to resize you will enter (cols , rows).
- OpenCV — (x, y) or (cols, rows)
- NumPy — (y, x) or (rows, cols)
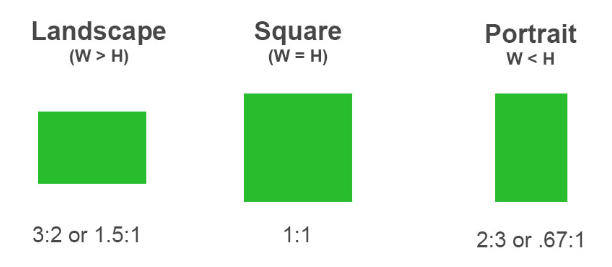
Aspect ratio — which is the ratio of the width of the image to the height of an image.
You can do that by specifying a custom size for either height or width and rescale the other accordingly.

Ignoring the aspect ratio can lead to resized images that look compressed and distorted:
Example : Images where aspect ratio is not maintained.
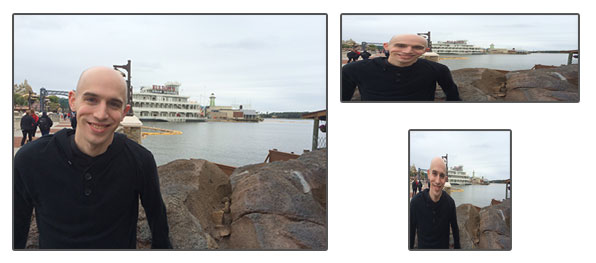
On the left we have our original image. And on the right we have two images that have been distorted by not preserving the aspect ratio — they have been resized by ignoring the ratio of the width to the height of the image.
Example resizing an image to custom size with aspect ratio
import cv2
import numpy as np
import matplotlib.pyplot as plt

img = cv2.imread('media/M2/party.jpg',1)

width = 672 # lets have custom width of 672

h,w = img.shape[:2]
width_ratio= width/w  # calculate the ratio of change in width

# multiply that same change to height and convert to int
custom_size = cv2.resize(img, (width, int(width_ratio * h)))

print('The new shape is: {} '.format(custom_size.shape))
plt.imshow(custom_size[:,:,::-1]);plt.title("Custom Size");
Output :

We also need to keep in mind the interpolation method of our resizing function.
The formal definition of interpolation is “the method of constructing new data points within the range of discrete set of known points.” In this case, the “known points” are the pixels of our original image. And the goal of an interpolation function is to take these neighborhoods of pixels and use them to either increase or decrease the size of image.
It’s far more beneficial (and visually appealing) to decrease the size of the image. This is because the interpolation function simply has to remove pixels from an image.
On the other hand, if we were to increase the size of the image the interpolation function would have to “fill in the gaps” between pixels that previously did not exist.
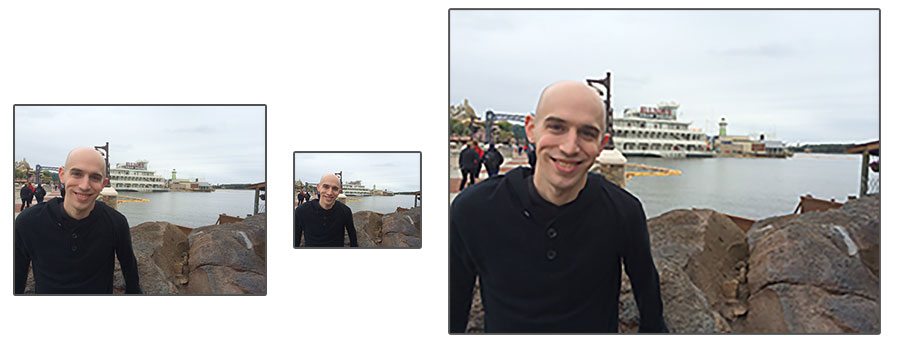
On the left, we have our original image. In the middle we have resized the image to half its size — and other than the image being resized, there is no loss in “quality” of the image. However, on the right we have dramatically increased the size of the image. It now looks “pixelated” and “blown up.”
** You’ll normally be decreasing the size of an image rather than increasing (exceptions do apply, of course). By decreasing the size of the image we have less pixels to process (not to mention less “noise” to deal with), which leads to faster and more accurate image processing algorithms.
We will be using the cv2.resize function to resize our images.
- The first argument is the image we wish to resize and
- the second is our computed dimensions for the new image.
- The last parameter is our interpolation method, which is the algorithm working behind the scenes to handle how the actual image is resized.
We need to keep in mind aspect ratio so the image does not look skewed or distorted – therefore, we calculate the ratio of the new image to the old image.
# import the necessary packages
import argparse
import imutils
import cv2
# construct the argument parser and parse the arguments
ap = argparse.ArgumentParser()
ap.add_argument("-i", "--image", required=True, help="Path to the image")
args = vars(ap.parse_args())
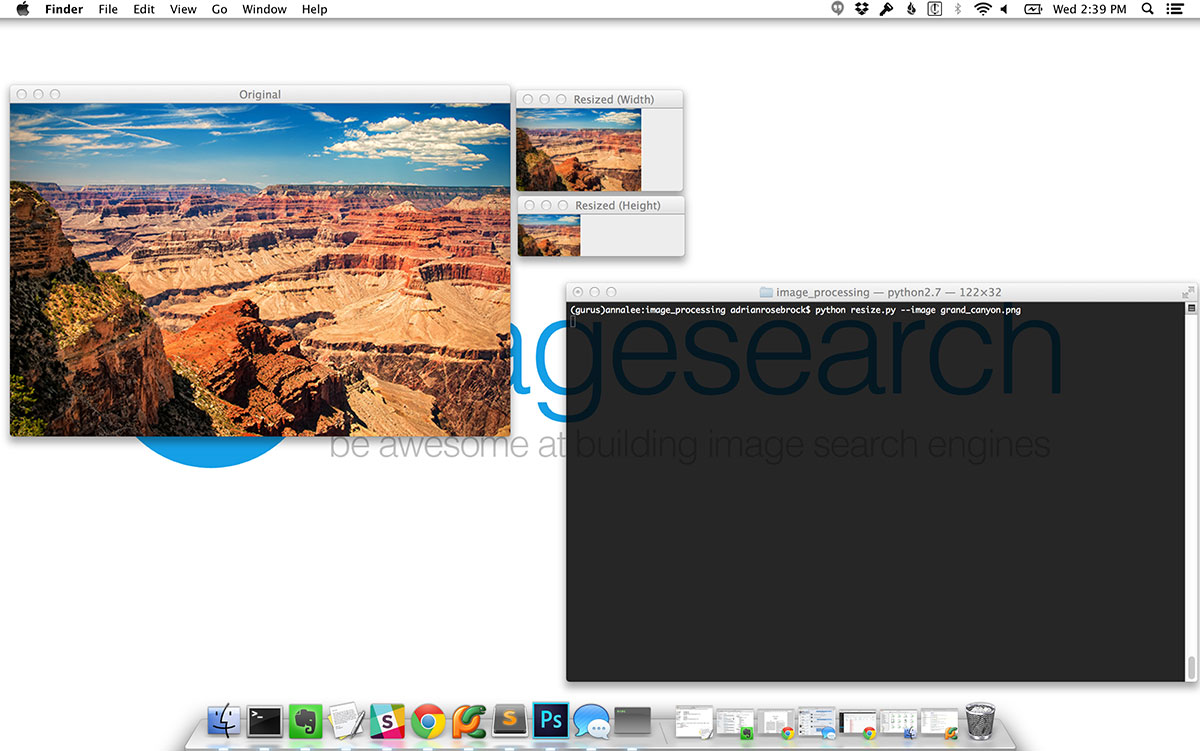
# load the image and show it
image = cv2.imread(args["image"])
cv2.imshow("Original", image)
# we need to keep in mind aspect ratio so the image does not look skewed
# or distorted -- therefore, we calculate the ratio of the new image to
# the old image. Let's make our new image have a width of 150 pixels
r = 150.0 / image.shape[1]
dim = (150, int(image.shape[0] * r))
# perform the actual resizing of the image
resized = cv2.resize(image, dim, interpolation=cv2.INTER_AREA)
cv2.imshow("Resized (Width)", resized)
# what if we wanted to adjust the height of the image? We can apply
# the same concept, again keeping in mind the aspect ratio, but instead
# calculating the ratio based on height -- let's make the height of the
# resized image 50 pixels
r = 50.0 / image.shape[0]
dim = (int(image.shape[1] * r), 50)
# perform the resizing
resized = cv2.resize(image, dim, interpolation=cv2.INTER_AREA)
cv2.imshow("Resized (Height)", resized)
cv2.waitKey(0)
Output :
Resize function – imutils package
Writing resize function.
def resize(image, width=None, height=None, inter=cv2.INTER_AREA):
	# initialize the dimensions of the image to be resized and
	# grab the image size
	dim = None
	(h, w) = image.shape[:2]

	# if both the width and height are None, then return the
	# original image
	if width is None and height is None:
		return image

	# check to see if the width is None
	if width is None:
		# calculate the ratio of the height and construct the
		# dimensions
		r = height / float(h)
		dim = (int(w * r), height)

	# otherwise, the height is None
	else:
		# calculate the ratio of the width and construct the
		# dimensions
		r = width / float(w)
		dim = (width, int(h * r))

	# resize the image
	resized = cv2.resize(image, dim, interpolation=inter)

	# return the resized image
	return resized
The function takes 4 arguments.
- The first argument is the image we want to resize.
- Then, we define two keyword arguments, width and height . Both of these arguments cannot be None , otherwise we won’t know how to resize the image.
- We also provide inter , which is our interpolation method and defaults to cv2.INTER_AREA .
Using the function :
# of course, calculating the ratio each and every time we want to resize
# an image is a real pain -- let's create a  function where we can specify
# our target width or height, and have it take care of the rest for us.
resized = imutils.resize(image, width=100)
cv2.imshow("Resized Width via Function", resized)
cv2.waitKey(0)

resized = imutils.resize(image, height=50)
cv2.imshow("Resized Height via Function", resized)
cv2.waitKey(0)
Output :

Interpolation methods
The goal of an interpolation function is to examine neighborhoods of pixels and use these neighborhoods optically increase or decrease the size of image without introducing distortions (or at least as few distortions as possible).
- cv2.INTER_NEAREST
- cv2.INTER_LINEAR
- cv2.INTER_AREA
- cv2.INTER_CUBIC
- cv2.INTER_LANCZOS4
The first method is nearest neighbor interpolation, specified by the cv2.INTER_NEAREST flag. This method is the simplest approach to interpolation. Instead of calculating weighted averages of neighboring pixels or applying complicated rules, this method simply finds the “nearest” neighboring pixel and assumes the intensity value. While this method is fast and simple, the quality of the resized image tends to be quite poor and can lead to “blocky” artifacts.
The cv2.INTER_LINEAR method which performs bilinear interpolation — this is the method that OpenCV uses by default when resizing images. The general idea behind bilinear interpolation — using slope intercept form. In this method, we are taking neighboring pixels and using this neighborhood to actually calculate what the interpolated value should be (rather than just assuming the nearest pixel value).
The cv2.INTER_AREA interpolation method. According to this article, thee cv2.INTER_AREA method is most similar to cv2.INTER_LINEAR . Be sure to read the summary of that article which gives a high-level overview of the general coefficient rules for this method.
Finally, we have cv2.INTER_CUBIC and cv2.INTER_LANCZOS4 . These methods are slower (since they no longer use simple linear interpolation and instead use splines) and utilize bicubic interpolation over square pixel neighborhoods. The cv2.INTER_CUBIC method operates on a 4 x 4 pixel neighbor and cv2.INTER_LANCZOS4 over a 8 x 8 pixel neighborhood. In general, I rarely see the cv2.INTER_LANCZOS4 method used in practice.
Checking the image applying each interpolation method :
# construct the list of interpolation methods
methods = [
	("cv2.INTER_NEAREST", cv2.INTER_NEAREST),
	("cv2.INTER_LINEAR", cv2.INTER_LINEAR),
	("cv2.INTER_AREA", cv2.INTER_AREA),
	("cv2.INTER_CUBIC", cv2.INTER_CUBIC),
	("cv2.INTER_LANCZOS4", cv2.INTER_LANCZOS4)]

# loop over the interpolation methods
for (name, method) in methods:
	# increase the size of the image by 3x using the current interpolation
	# method
	resized = imutils.resize(image, width=image.shape[1] * 3, inter=method)
	cv2.imshow("Method: {}".format(name), resized)
	cv2.waitKey(0)
So which method interpolation methods should you be using?
When increasing (upsampling) the size of an image, consider using cv2.INTER_LINEAR and cv2.INTER_CUBIC . The cv2.INTER_LINEAR method tends to be slightly faster than the cv2.INTER_CUBIC method, but go with whichever one gives you the best results for your images.
When decreasing (downsampling) the size of an image, the OpenCV documentation suggests using cv2.INTER_AREA — although this method is very similar to nearest neighbor interpolation. In either case, decreasing the size of an image (in terms of quality) is always an easier task than increasing the size of an image.
*** Finally, as a general rule, cv2.INTER_LINEAR interpolation method is recommended as the default for whenever you’re upsampling or downsampling — it simply provides the highest quality results at a modest computation cost.
In general, you’ll find that cv2.INTER_LINEAR is a good default choice.
It’s important to note that if you are concerned about image quality, it’s almost always preferable to go from a larger image to a smaller image. Increasing the size of an image normally introduces artifacts and reduces the quality of the image.
